 “I have all this data in my old system. How will you get it into Salesforce? What do we need to do?” These are questions we often get asked early in the process of talking to a client.
Each migration is unique. For example, a migration from Raiser’s Edge for one client may be different than a migration from Raiser’s Edge for another client. Clients use Raiser’s Edge in varying ways and make different choices during a migration. While each migration project has its own characteristics, we have created consistent processes to ensure a successful one. These steps also apply to other systems like SQL Server or DonorPerfect.
Our process includes a high level of visibility to ensure key stakeholders understand what to expect, what will be migrated, what will not be migrated, and how the migration will happen. When our clients have this visibility, they are in control of and have insight into the effort level of the migration and can determine what is worth the cost.
Our migration process is 80% planning and testing, and 20% production migration. We ask clients to focus on testing and planning because finding issues then is much less costly than finding them during production. Let’s dive into these stages.
Planning
Planning can be outlined in four steps. This starts in the Discovery phase of our work and is completed in the Implementation phase.
1. What data sources will be migrated? (10,000 ft level)
During Discovery, we discuss where your data—that you want in Salesforce at the end of the project—is today. This is typically in another CRM system such as Raiser’s Edge or Insightly. It could also be in Excel or Google Sheets. We decide which data sources will be migrated into Salesforce.
2. What amount of source data will be migrated? (1,000 ft level)
At this stage, we identify what high-level filters will be on the source data. As throughout the process, decisions made at this level impact the effort. Oftentimes at this level, it’s about understanding how consistently you used your prior system over the years. We often see that for the past three to five years the data was consistently entered. Going back beyond that time, the data was entered differently due to changes in processes, changes in definitions of how data was managed, etc.
Bringing over inconsistent data takes more time in planning (how does it translate?) and testing (did we bring over all the variations correctly?). We ask more detailed questions at this level. Do you need all the data from the beginning of time? Do you want just the last five years of data? Or maybe you want all client contacts that have used your services, but case details for those that have used your services in the last three years.
3. What do you need within a specific data source? (100 ft level)
Now that we know the data sources and what high-level filters will be in the migration, the next step is to decide what types of things from the data will be migrated. Often this also means identifying what we will NOT be migrating. For example, if this is a fund development migration from Raiser’s Edge, we know we want accounts, contacts, and opportunities (gifts). But do we want event participants or pledges?
Decisions in this step can dramatically impact the time, effort, and cost of the migration.
4. What data fields and values will be migrated? (1 ft level)
This is the final stage and is heavy in the details. We go through field by field to determine the specifics of the migration for each field. Does this field need to be migrated? What should the values be? Are there any translations of data? For example, you may have solicitation codes that define how you will reach out to your constituents. In reviewing the data, you realize that you have two values, No Mail and Email Only, that you have used interchangeably. In Salesforce, you want both of these to be Email Only. We will map these two values to the one value in the migration process.
Testing
When we get to the one-foot level in the planning process, we are at the point where we start our testing process. This process has five steps that we repeat. Let’s walk through the process.
We will complete the five steps first for accounts/households and contacts. Then we will move on to another chunk of data. This is so we make sure the foundation of our migration is complete and correct before we add on to it. Contacts and accounts are almost always the most foundational data types in a CRM. For each project, these chunks may be different. Some common dependencies are: campaigns before opportunities, baseline opportunities before soft credits, or cases before case notes.
During the testing process, we are documenting in detail the steps we take to complete the migration. This is to ensure that we have a smooth production migration. By following the detailed plan, we avoid missing a step in the process. No detail is too small to write down including how the data is retrieved from the source file, any manual manipulations, and the order of each step. We also document any data cleanup that needs to be done and when (before or after the final migration).
1) Finalize mapping. This step finalizes the one-foot level in planning. This is complete when all the fields have been mapped and reviewed by the client.
2) Migrate sample and validate. This is usually a step we include for one of two reasons. If it is difficult for the client to understand how this data fits into Salesforce, we will migrate a small sample (10-20 records) so they can see their real data in the system and understand how it fits. This can also reveal unexpected results and allows us to make adjustments before we migrate thousands of records.
The second reason we may take this step is if the migration is more complex. It is important for both the client and us to see the data in Salesforce to validate that we pulled the right details. A type of complexity is when the data comes from multiple places in the data structure (example: in Raiser’s Edge there are (at least) two tables for gifts that are used to populate the opportunity). If neither of these cases apply, we will skip this step.
3) Migrate all data into a full sandbox for testing. At this point, we will do a test migration of the data we are working with. In the example scenario we mentioned earlier, the first set of data would be a migration of the accounts and contacts.
4) Validate internally. Before we turn it over to the client, we have another member of the internal team validate the migration. This is a quick review to avoid passing it to the client with obvious mistakes.
5) Client validates. Now it’s time for the client to validate. As mentioned in the beginning, this is where we want the client to spend their time. By ensuring and validating that the migration is right in the test environment, we will save costly production migration changes. Because we have chunked out the data, the client only needs to focus on validating this piece of data at this time (in this case, accounts and contacts). Typically, the client project team will do an initial validation and then they will ask key players in their organization (subject matter experts) to also validate.
Once the client validates the current piece of data (e.g. accounts and contacts), then we move on to the next piece and repeat the steps.
When the full test migration has been validated and approved by the client, we are ready to do the production migration.
Production Migration
Because we spent quality time validating the test migration and documenting the steps of the migration, the production migration is just executing the plan.
The first thing we do is a “paper tech.” In theater, a paper tech is a session when the technical and design team talk through the show, ensuring everything’s going to work as planned. Stage managers can use this session to ensure all is written correctly in the prompt book.
In our paper tech, we walk through the migration schedule to ensure that everyone knows what they need to do and when. We review our estimated timeline with a focus on when we will need the client to be available for validation, where we have hard stops for validation, and where we can continue on while they validate. Because the client has validated the migration in the testing process, they know what they need to do when the time comes.
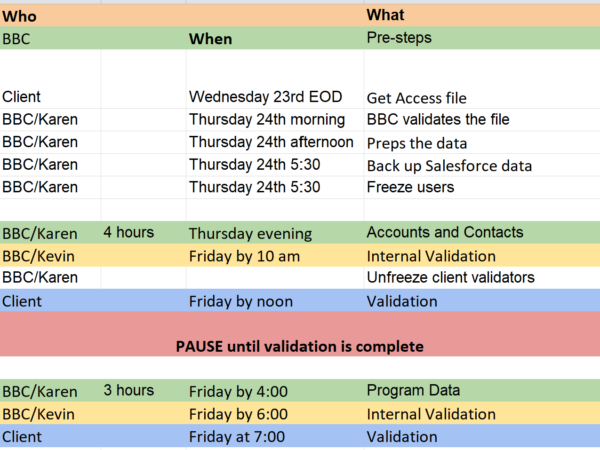
Here’s a snapshot of the plan:
When all the steps are completed, we have one final validation step for the client. They need to give final approval of the migration.
Summary
Data migrations are always time-consuming, but the careful steps in Bigger Boat’s process ensure that you have complete visibility and you make the decisions that are right for your organization. For more on what our process might look like, you can also see one of our client’s experiences with a Raiser’s Edge migration.
Contact us to discuss your specific needs.